

Why Hire a Professional Photographer? Here’s What You Need to Know
Not sure if you need a professional photographer? This post breaks down when to DIY and when to hire a pro. Learn the key differences between camera phones and professional gear, and see a side-by-side comparison of images captured with both.
In today's world, everyone has a camera in their pocket. With the rise of smartphones, it's easier than ever to capture moments on the go. So, why should you consider hiring a professional photographer when your camera phone is always within arm's reach? The answer might surprise you—because in reality, not everyone *needs* a photographer.
Do You Really Need a Professional Photographer?
Let's start with an honest truth: not every moment requires a professional photographer. There are plenty of situations where your smartphone camera is more than sufficient. For instance, if you're snapping casual shots of your pet or documenting a fun day out with friends, your phone is probably all you need. Modern smartphones are equipped with impressive cameras that can produce great results for everyday photography.
However, there are times when the expertise of a professional photographer is invaluable. If you're marking a milestone, like senior portraits, family gatherings, or a special event, the difference in quality between a smartphone and professional photography becomes clear.
Camera Phone vs. Professional Gear: What’s the Difference?
Camera phones have come a long way in terms of technology. They are convenient, user-friendly, and capable of producing decent images under the right conditions. However, they do have limitations that professional cameras and lenses can easily overcome.
**1. Image Quality:**
Professional cameras are designed with larger sensors, which means they can capture more light and detail than a smartphone. This results in higher resolution images, better color accuracy, and improved performance in low-light situations.
**2. Depth of Field and Lenses:**
One of the most noticeable differences between a smartphone camera and professional gear is the ability to control depth of field. Professional photographers use a variety of lenses that allow them to create the desired focus and background blur, which is often crucial for creating stunning portraits. While smartphones have tried to replicate this effect with software, it’s not quite the same as what can be achieved with high-quality lenses.
**3. Versatility in Lighting:**
Lighting can make or break a photo. Professional photographers have the skills and equipment to work with natural light, studio light, and everything in between. They understand how to manipulate light to create the perfect ambiance and ensure that the subject is highlighted in the best possible way. Camera phones, on the other hand, rely heavily on automatic settings that may not always produce the desired effect.
**4. Post-Processing:**
Another key difference is the post-processing stage. Professional photographers not only capture the image but also spend time editing and retouching to enhance the final product. This level of post-processing can elevate an image from good to outstanding—something that's difficult to achieve with a smartphone alone.
**5. Expert Guidance on Location and Outfit Choices:**
One often-overlooked benefit of hiring a professional photographer is their ability to provide guidance on location ideas and outfit choices. Whether you’re looking for a scenic outdoor setting or a stylish urban backdrop, a professional photographer can suggest locations that align with your vision. They can also offer advice on what to wear to ensure that your outfits complement the setting and enhance the overall aesthetic of the shoot.
Visual Comparison: Professional Camera vs. Smartphone
To give you a clear understanding of the differences between professional camera gear and smartphone cameras, I’ve put together three sets of images taken under the same conditions. Each set features portraits of my daughter, first from the thighs up and then a close-in crop of her face. All cell phone images were taken using the 3x lens and were not digitally zoomed to maintain maximum image quality. I wanted to ensure that the comparison was as fair as possible by using the best optical performance the phone could provide.
Here are the images side by side: 1) Professional camera and gear with retouching(left), 2) cell phone using portrait mode and remastering(center), and 3) cell phone using regular photo mode with no editing(right).


1A - Professional Gear, professional editing
This set was taken with my Canon R6M2 camera, paired with a 28-70mm lens. I used an off-camera flash to enhance the lighting, and the images were retouched to bring out the best details.

1B - Close crop of above image
Observe the details in the eyes, the freckles across the nose, the texture in the hair, and the stitching on the fabric collar. And yes, there's a loose tooth on the bottom! This image will print beautifully at sizes 8x10” and larger.

2A - Cell Phone, remastered on the phone
The second set was captured using my Samsung S23 Ultra, specifically in portrait mode. The images were then remastered using the phone’s built-in editing tools. Background was blurred artificially using the camera software.

2B - Close crop of the above image
Notice how the freckles on the nose are barely visible, with reduced detail in the eyes and shirt collar. The skin tone appears quite gray. You can also see how the AI remastering on the phone has exaggerated the stitching on the collar.

3A - Cell phone, using regular photo mode. No remastering or editing.
The final set was taken with the Samsung S23 Ultra in its standard photo mode, with no additional retouching or editing. This set reflects what you might get from a quick snapshot without any extra adjustments.

3B - Close crop of the above image
The image looks dark, soft, and out of focus, with minimal contrast and detail in the eyes, skin, hair, and shirt collar. Some stitching on the collar is missing. While it might look acceptable on a cell phone screen or social media, it won't print well at sizes 5x7” or larger.
By comparing these sets, you’ll clearly see how the choice of tools and techniques can greatly influence the final image. From the depth and detail captured by the professional camera to the convenience and quick results of the smartphone, each has its benefits depending on your needs. Although I wouldn’t typically recommend the outfit my daughter is wearing for a professional portrait session, it provides a great example of the differences in color depth and saturation between a professional camera and a cell phone. The contrast is striking, with the Canon producing richer colors, illustrating how professional gear can elevate the overall quality of a portrait.
Conclusion
While camera phones are incredibly convenient and capable of capturing everyday moments, there’s a clear distinction when it comes to the quality and creativity that professional photography offers. Not everyone needs a photographer for every occasion, but when the moment matters, investing in professional photography can make all the difference. At Freetime Portraits, we’re here to ensure that your most important memories are captured with the care and expertise they deserve—from providing expert advice on location and outfits to delivering high-quality, polished images.
Ready to capture your special moments? Use the button below to contact us today for a free consult!

Understanding Photography Pricing: Why Transparency Matters
Behind every photo session, there’s much more than just the time spent taking pictures. From the initial consultation and location scouting to image culling, editing, and in-home ordering sessions, I easily invest 8+ hours into each family session. Understanding the true investment of time and effort is crucial when considering photography pricing. Many photographers rely on upselling to make their business sustainable, but I’m taking a different approach. With my "Full Access" pricing plan, you’ll know exactly what you’re paying upfront, with no hidden costs or upsells. This transparent model ensures you get all your images and high-quality prints without the pressure of post-session add-ons.

Fireball loop coaster at the Howard County Fair
Many photographers structure their pricing with an initial sitting fee, which usually includes a few digital images, followed by an upsell after the gallery is delivered. For example, you might see a family session priced at $250. After receiving your gallery, you may realize that you want more than the 10 included images—you want all 40. The photographer then offers you the extra images at $10 each, adding up to $300. Now, your session cost has increased to $550.
But what if you also want a few prints? Let’s say you opt for three small 8x10" prints and a large 16x24" metal print for your wall. The photographer charges $14 for each 8x10" print (which costs them $3) and $300 for the 16x24" metal print (which costs them $120). You know you could order that metal print online yourself for around the same price, but that can be daunting if you’re not experienced with ordering large expensive pieces of art. Questions arise like, "Do I need to do color correction?" "Is the crop right?" "Does this company provide good quality?"
In the end, you’ve spent nearly $900 on your session. You have 40 digital images, three 8x10" prints, and a 16x24" metal print. After the photographer pays for your print products, they’ve made $770 from your session. This doesn’t include business expenses like software subscriptions, website hosting, marketing, equipment, etc. If the photographer serves 100 clients per year and averages this on each client, that totals $77,000. With operating expenses accounting for around 15%, they take home about $66,000 per year before taxes—without any benefits included, like health insurance.
However, serving 100 clients per year is a heavy workload, especially when you consider the seasonality of photography. The demand isn’t evenly spread out throughout the year but is heavily concentrated in the spring and fall months. This uneven distribution can lead to burnout, as trying to fit so many sessions into peak seasons can be overwhelming. A more realistic number is 35 to 50 clients per year, which brings the income down to around $33,000 or less.
In this scenario, you end up paying more than three times what you initially expected, while the photographer barely earns a livable wage in Maryland. You may feel like you’re overpaying your photographer, but the reality is that they rely on upselling to make their business sustainable.
Many of my clients don’t realize just how much work goes into each photo session behind the scenes. Beyond the hour or so we spend together during the actual shoot, I invest several more hours before the session begins. This includes tasks like the initial consultation, scouting potential locations, suggesting inspirational shots, and reviewing wardrobe choices. After the session, I dedicate additional time to culling and editing the images to ensure they’re ready for presentation. I also offer an in-home ordering session where we can discuss print products, and I help you place your order. All in all, I easily spend 8 to 10 hours on each hour long family session, sometimes more.
To offer my clients a more straightforward experience, I've decided to do things a bit differently and introduce an alternative option with my "Full Access" pricing plan. Alongside my traditional pricing plan with a $250 session fee, I’ll also be offering a “Full Access” plan where the session fee reflects what I need to earn from each client. All the images in your gallery are included in the full access plan, with no upselling afterward. Additionally, instead of marking up print products by over 200%, you can purchase them through me at my cost. The only exception will be albums, which require additional time and effort to create; I’ll add a $50 fee to cover this.
I believe my clients will appreciate this pricing plan because it provides a clear understanding of the true investment required upfront, removes the pressure of post-session upselling, and ensures they receive high-quality print products from my trusted lab rather than lower-quality options from a local drugstore.
Please note, this pricing model is tailored for portrait photographers who work solo on location with families, couples, seniors, and some headshots. Photographers with assistants, those doing weddings, commercial work, corporate headshots, or those with a studio location will have different expenses and pricing models.
My goal is to offer a straightforward, transparent pricing experience that delivers both value and peace of mind to my clients. I look forward to capturing your memories with a pricing plan that makes sense for everyone involved.

Shooting the Milky Way Galaxy
My “shot” at the Milky Way Galaxy.

Capturing the ethereal beauty of the Milky Way galaxy is an awe-inspiring experience. The gleaming stars against the darkness evoke wonder. After adjusting camera settings, the Milky Way unveils its intricate details. Each image captures the universe's vastness and whispers a tale of cosmic enchantment.
I have been wanting to get a good shot of the Milky Way for awhile now, but I live in the Maryland suburbs with too much light pollution. This past weekend my family planned a camping trip to Chincoteague to celebrate my daughter’s pre-K graduation, so I decided to give it a shot. It was actually pretty easy, and did not require expensive specialized equipment, or for me to miss any sleep. For this shot I used my Canon R6 Mark II, 28-70mm F2L zoom lens, remote release, and a tripod. Below is my workflow.
I am selling prints of this photo in 12x18 and 11x14 on Red River Polar Gloss Metallic Paper for $50 and $40. Price does not include tax or shipping. To purchase a print, send an email to mike@freetimeportraits.com with subject “Milky Way Chincoteague Print”, your size choice, name and shipping address. I will email you an invoice, and once paid I will ship your print.
1) Seek out a dark area, or try to find an area that is dark to the south. You can use a resource like this - https://darksitefinder.com/maps/world.html#6/36.879/-85.840 When I took this shot I was in a green area, but the ocean was to the south. Try to avoid a place where people will be, especially if those people are not doing exactly the same thing you are doing. You will get annoyed by people getting in your shot and shining their white lights everywhere.
2) Once you decide where to go, get the app photo pills. https://www.photopills.com/ This app costs $10 and it is worth it! A little bit of a learning curve to it, but it will help you setup and plan your shoot in advance. You can use the app to check the location of the moon and milky way at your site and pick the best time to shoot the Milky Way. You don’t want to shoot when a full moon(or even a 1/4 moon) is in the sky, and this app will let you check that, even months out in advance.
3) Check the weather forecast and make sure the skies will be clear when you plan to take your shot.
4) Visit the site during the day before your shoot. This is where the photo pills app really shines… Go into the augmented reality mode, and forward it to the time you plan to take your shot. You can then see on your phone screen where the milky way will be in the sky. Walk around and try to pick a shooting position that will incorporate some interesting foreground elements into the shot. You may find that you adjust your shooting time to get the milky way in a better position based on your location and foreground choices. In this case I wanted the dirt road and the Assateague Lighthouse to be strong elements in the shot.
5) Go back to your spot just before its time to shoot and get setup. I did not have to stay up crazy late to get this shot, it was taken at 10:08 pm local time. If you saw any hazards during your daytime visit, be sure to account for those traveling to the location at night.
6) You are going to need to use full manual mode on your camera. Switch auto focus off. Easiest thing to do is find a bright star in the sky, and adjust the focus manually until that star appears as small as possible. Zoom in on the back screen to help if you can. Then put your camera on a tripod, get your composition(remember why you visited during the day?), and don’t touch the focus for the rest of the night. You can arrive early at blue hour and take a foreground shot, and then later blend it in photoshop. Personally I found with the light from the lighthouse and sequator that I did not need to do that.
7) For my shot I used 28mm, F2, 5 sec shutter, and 6400 ISO. Photo Pills has a “spot stars” feature where you input your equipment, and it will give you the recommended shutter speed to eliminate star trails, and get the stars as sharp as possible. If you take too long of an exposure, you will get star trails and the stars will not be sharp. Its important to figure this out! For example, if I wanted to use my 24-70mm F2.8 lens, It tells me the longest recommended exposure time is 11 seconds. You can use my settings above, but you will need to adjust if you don’t have the exact same equipment as me. Use the exposure triangle to make your adjustments equivalent. Expect to use an ISO of at least 6400. Really, the most important thing is to not blow out your image and loose detail.
8) I setup my camera to shoot on a timer, and then take 10 consecutive shots. So with a 5 second shutter speed, I had 50 seconds of exposure total. below is what one of those exposures looked like straight out of the camera. You can see there really is not much detail. You will need to post process these images to bring out the detail in the Milky Way.

Unedited raw file straight out of camera, shot on a Canon R6 Mark II with a 28-70mm F2L lens, at ISO 6400, F2, and 5 second exposure at 10:08 pm on 8/12/2023.
9) This is where the magic of the free app “Sequator” comes in. https://sites.google.com/view/sequator/download I do believe its a windows only app, sorry mac users, but I believe there is similar app for the Mac but it is not free. Sequator will take the 10 images(it could be more or less, I just used 10 because that was the max I could do with the built in counter) and stack and align the images. Noise is random, so when multiple images are stacked the noise will different for each image, while the stars stay the same. So it is able to filter out alot of the noise you get when shooting under exposed at higher ISO.
Sequator has an option to freeze the foreground, and I highly recommend doing that. Here’s a link to a tutorial - https://www.youtube.com/watch?v=ODMMVrL8OrI&t=13s Then you don’t need to take a separate foreground shot.
10) Open a post processing program like lightroom, photoshop, or digital photo professional plus and edit your image to bring out the Milky Way. Its really all about increasing the contrast, clarity, and expanding the tonal range. I ended up raising the exposure, contrast, clarity, saturation, and abit of dehaze to get to the final image.

Sweet Memories: Strawberry Picking at Larriland Farms
Annual family strawberry picking outing.

There's something truly special about spending quality time with loved ones amidst the beauty of nature. Recently, my family and I had the joyous opportunity to visit Larriland Farms for a delightful day of strawberry picking. In this blog post, I will share our memorable experience, filled with laughter, sunshine, and the sweet taste of freshly picked strawberries.
As we arrived at Larriland Farms, the vibrant rows of strawberry plants stretched out before us, inviting us to embark on a berry-licious adventure. Excitement filled the air as we donned our sunhats and ventured into the fields, ready to experience the joy of hand-picking ripe, juicy strawberries.
Amidst the strawberry-laden plants, there was a delightful twist to our family's experience. My daughter, who typically doesn't enjoy fruit, discovered a newfound love for strawberry picking. While she may not be fond of eating fruit, she found immense joy in carefully selecting the reddest and juiciest strawberries, placing them in her carton with a proud smile on her face. It was a delightful surprise and added an extra layer of excitement to our adventure.
With cartons in hand, we eagerly combed through the strawberry plants, each of us engrossed in the hunt for the perfect berries. My daughter's enthusiasm for picking, despite her aversion to eating fruit, became infectious. We laughed and cheered one another on, reveling in the shared experience of connecting with nature and each other. Strawberry picking became a catalyst for deeper family bonding and created lasting memories.
The sweet aroma of freshly picked strawberries wafted through the air, enticing us with its irresistible allure. While my daughter still held reservations about eating the fruits of her labor, she took delight in sharing her bountiful carton with the rest of us. We savored the sweetness of the freshly picked berries, relishing their juiciness and vibrant flavors. Even if she didn't partake fully, her joy in picking the strawberries made the experience all the more special.
As our cartons filled with the vibrant red berries, we couldn't help but reflect on the unique experience my daughter had at Larriland Farms. Her love for strawberry picking, despite her aversion to fruit, became a cherished part of our family story. It reminded us that joy can be found in unexpected places and that even small moments can have a profound impact on our connections with one another.
Our strawberry picking adventure at Larriland Farms was an experience filled with happiness, laughter, and the simple pleasure of connecting with nature. While my daughter's aversion to fruit remained, her love for picking strawberries brought an unexpected joy to our family outing. The beauty of the farm, the taste of freshly picked berries, and the bond we shared as a family created memories that will be cherished for years to come. We left Larriland Farms with cartons full of the luscious red berries and hearts brimming with gratitude for the gift of quality time and the sweetness of life's simple pleasures, even if they come in unexpected forms.


A Meaningful Journey: Planting Flowers and Creating Floral Tributes at Arlington National Cemetery
My son and I participated in the Children’s Program for Renewal and Remembrance held by the NALP at Arlington National Cemetery.

Placing flower arrangements on tombstones at Arlington National Cemetery for Renewal and Remembrance.
Our visit to Arlington National Cemetery for the Renewal and Remembrance event was a deeply personal and poignant experience. Amidst the solemn atmosphere, my son and I had the privilege of joining other volunteers in planting flowers in beds and crafting heartfelt floral arrangements. In this blog post, I will share our personal journey, highlighting the profound significance of these floral tributes at Arlington National Cemetery.
As we stepped foot into Arlington National Cemetery, a sense of reverence washed over us. The serenity and beauty of the surroundings made us acutely aware of the hallowed ground on which we stood. Planting flowers in the beds allowed us to connect with the sacredness of the space, creating a personal bond with the soldiers who rest there.
With every delicate seed we planted and every carefully arranged bloom, we poured our hearts into honoring the fallen. The act of tending to the flowers became an expression of our gratitude, respect, and remembrance. Each petal represented a small gesture of love and appreciation for the sacrifices made by those who fought for our freedom.
As we worked alongside fellow volunteers, we discovered a shared sense of purpose and connection. Together, we nurtured the flowers, fostering a sense of community as we collectively honored the soldiers. Through conversations and shared experiences, we deepened our understanding of the significance of the cemetery and the memories it holds.
While our connection to the soldiers may be indirect, our actions held a deeply personal meaning. The flowers we planted and the arrangements we created served as symbols of remembrance and gratitude. As we touched each blossom and carefully arranged them, we felt a profound sense of honor in our role as stewards of their memory.
As we concluded our visit, we carried with us a profound sense of fulfillment. The flowers we planted and the floral tributes we crafted will continue to bloom and flourish, leaving a lasting legacy at Arlington National Cemetery. Our small contributions, filled with personal intention and love, will serve as a gentle reminder of the sacrifices made by the brave men and women who rest there.
Participating in the Renewal and Remembrance event at Arlington National Cemetery was a deeply personal and meaningful journey for my son and me. Through planting flowers and creating floral tributes, we forged a personal connection with the soldiers and their stories. The act of tending to the blooms became an expression of our gratitude, love, and remembrance. May the flowers we planted and the arrangements we crafted continue to bloom, serving as a lasting tribute to the brave souls who have sacrificed so much for our freedom.


What to wear for your senior photo session
Your outfit choices make a big impact on how your senior session turns out!

Senior photo in jean jacket
Your senior year of high school is such a pivotal moment in your life, where you transition from being a child and dependent on your parents to an independent adult with responsibility for your own actions.
So what to wear for this traditional rite of passage? When making this decision, I highly recommend you think about future needs for your portrait - like college applications, publications, social media profile photos, announcements, yearbooks, company ID's, passports, etc. There's a good chance you might be able to use one of your senior photos for these applications if you share your needs with your photographer in advance.
The other part is who is your audience? Friends, relatives, future employers, or your own family in twenty years? Who do you expect to see these photos, or receive a copy of them? This can tie into which outfits you choose and color choices. Have some variety in your outfits and poses to cater to a wide range of needs and audiences. These are good things to discuss with your photographer!
So after you have decided on what you need these photos for and how they are going to be used, follow these tips below to help you pick your outfits.
This one is number one because it is the most important one! Choose outfits that you feel comfortable and confident in, and fit you well. This will set the stage for a successful photo session! If you feel awkward or cannot wait to change out of what you are wearing, you are not going to photograph well in it.
Don't wear clothing that is distracting and draws the eye. In general solid plain colors work best. Nothing too bright or loud. Avoid patterns and stripes. When someone sees your photo, you want them to see you and not the Playstation shirt you are wearing.
Don't be afraid to express yourself a bit with your clothing choices. This kind of goes against #2 above, but remember, you generally wear multiple outfits for your senior session. Wear your favorite slogan/brand shirt if you feel its part of your identity, but keep the other outfits more neutral.
Put some thought into how the clothing colors will blend in with the existing colors at the shooting location. A good resource for this is Adobe color palette generator - https://color.adobe.com/create/color-wheel I personally recommend the complimentary color schemes.
Make sure you take care of yourself in the weeks leading up to your session. Get enough sleep, avoid foods that trigger skin breakouts, use sunscreen to avoid sunburns, and try to be a little conservative if you play sports and not break anything right before your session.
Show some variety. Go for a formal look and a casual look. Use things like jackets, hats, bags, and other accessories to play with color and quickly change your look.
Use an outfit to show your interests and passions. Do you play a sport? Like football or mountain biking? A musical instrument? Are you proud of your current job? These can all be incorporated into your outfit and session. For example with football we can shoot you with pads and jersey on, football in hand, and the field goal in the background on the high school football field(I could even show up to a game and take photos of you playing). Mountain biking can be in the woods, with bike and protective gear on, mud too, just like during a real ride.
Your outfit should fit in with your environment. You might be able to get away with wearing a tuxedo on a beach for a beach wedding, but a suit on the beach is not going to work for a senior portrait.
Ask for help from your network. If you are not sure about an outfit, ask your family and friends for their opinions. Your photographer is a great resource to use as well!

Scouting
Ever wonder why photo shoots can be so expensive? They require alot more time behind the scenes than you would think. One of the things a good photographer will do, if they are shooting at a location that they are unfamiliar with, is to visit the location before the shoot and plan out what shots they want to take. This past weekend I hiked to an old abandoned town that I will be doing a shoot at shortly, and brought the family along for the hike. I even got them to agree to a few portraits! I think its a really cool location, and I can’t wait to do my client session there!


Back to School
I know its abit late, but I was going through my photos and found this one, and I figured it would make a good blog post. Alot of parents take pictures of their kids on their first day of school in elementary school, and write things on chalkboards and use it as a prop in the photo. I opted for a different approach, and decided to make a fake magazine cover using my photoshop skills.

Back to School!

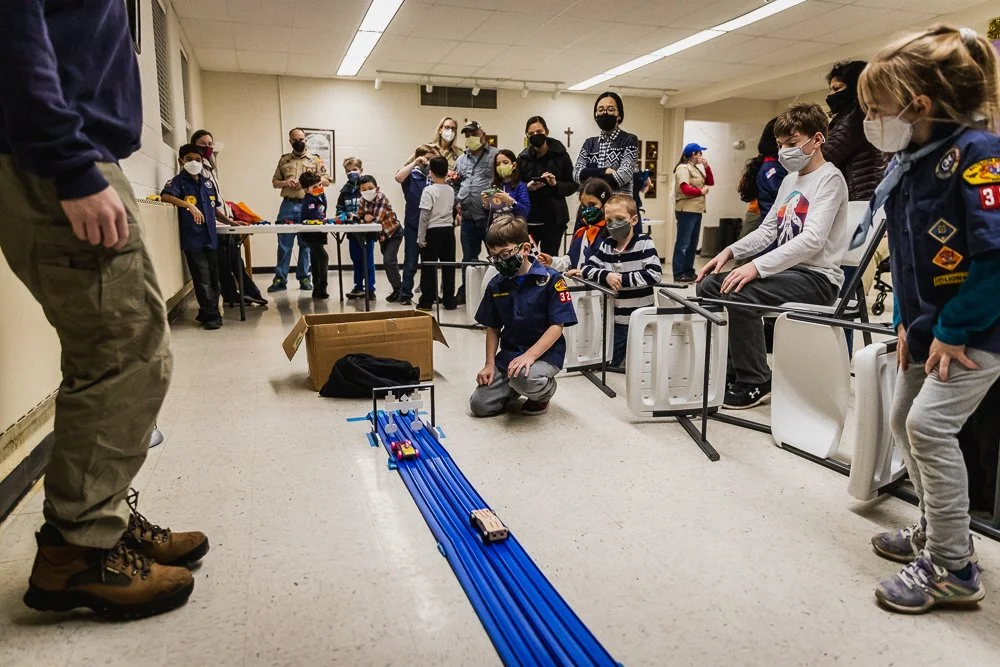
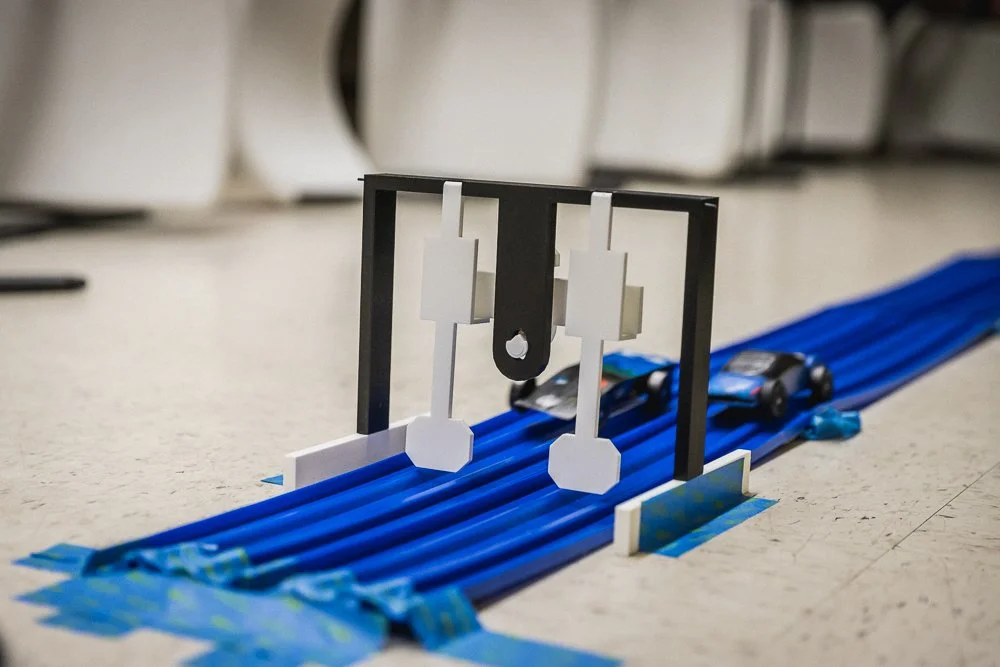
Pinewood Derby
2022 Cub Scout Pack 323 Pinewood Derby
So late last year, before Thanksgiving, it looked like my son’s cub scout pack, Pack 323 in Woodstock, was going to get the full pinewood derby treatment this year. Then after Thanksgiving Omicron arrived, and the positivity count peaked again. Plans were changed to have it outside in a local park instead of the church basement, where social distancing guidelines could be better adhered to. Then within a few weeks of the date, levels dropped, and we changed plans again and decided to have it in the church basement, but keep it simple.
Our pack has uses a yellow super track that has electronic timing and is run by computer software. Quite an elaborate setup, because their are speakers to hook up, a projector display, and assembling the track and securing it to the floor is not easy either. So we decided to just setup a basic two lane drag race track using some of the blue practice track that you can buy at the scout store. That’s what we actually used when the 2021 pinewood derby was held outside in a local park.
Where am I going with all this? Well, my wife gifted me a 3D printer this past Christmas, and I was looking for printing projects. So for the pinewood derby this year on my 3D printer I printed the trophies for the den winners, a medal for the overall winner, a start gate for the blue track, and a finish gate for the blue track. I bring all this up because you will see these items in the photos I took during the derby, and may wonder how those items can be obtained. Shoot me an email and I will be happy to share the files with you. Enjoy the photos from the event! These were all shot handheld documentary style on my Canon 6D2 with a 24-70mm F2.8, using the available light from the overhead fluorescent lighting.


Group shot for HoCo Seido Karate
Took this photo last weekend for my son’s Karate school.. They wanted a group photo taken for their Facebook page, and also to send to the head of their Seido Karate organization as a birthday greeting. When I learned they were taking a photo I offered my services pro gratis… For this shot I setup two strobes on either side of the camera, bouncing off 53” silver umbrellas.

HoCo Seido Karate February 2022

Halloween Headshots
Its Halloween!
Had some fun setting up all the gear in the garage to take some nice headshots of the kids with their pumpkins before heading out for some trick or treating. Just a simple two light setup with some modifiers, black backdrop, and a fog machine. These kids will do anything for candy…


The Bookmark

Photograph, or a bookmark?
Ever use bookmarks? Did you find a recipe online that you really liked, then added a bookmark in your web browser so you could go back later and find it again? Photographs do the same thing… Years from now my son and daughter will see this pic and recall all the details of this October day when we visited the Rehoboth Beach Boardwalk with Grandpa and Grandma. The stops at the arcade, the ice cream, gifts at the kite store, etc. I took this pic and when I look at it later I will remember the great time we had, and the long ride that it took to get there(which the kids slept thru).
Anyone can take a photograph that will act as a bookmark, but a photographer will take a photo and turn it into a work of art that you want to display in your home.

The Bench
Just sitting on the bench…

Last weekend Grandpa and Grandma came to visit the kids, and they wanted to surprise the kids with a visit to the beach. So we moved the car seats over and piled everyone in their SUV, and headed east. Ended up going to the Rehoboth boardwalk, in DE. Parking was scarce, but it wasn’t too crowded on the boardwalk. The kids walked by an arcade and wanted to go in, and Grandpa and Grandma wanted to rest outside on the bench directly across from the arcade. While I was inside I looked out at them on the bench, and though what an awesome candid shot!